

Table of Contents
- 1. Countertop Sealant vs. Granite Sealer: Two Different Jobs
- 2. Where Countertop Sealant Actually Belongs
- 3. Matching Sealant Chemistry to Countertop Material
- 4. Countertop Sealant Application: A Practical Walkthrough
- 5. Countertop Sealant vs. Granite Sealer: Quick Reference
- 6. Common Mistakes
- 7. Frequently Asked Questions
Countertop sealant and granite sealer get confused constantly, and the mix-up leads to real problems — one is a joint compound for specific seams, the other is a penetrating stone treatment for the whole surface, and using one in place of the other either leaves gaps unprotected or wastes a surface sealer on a job it was never meant to do. Countertop sealant has a narrow, specific role: it seals the perimeter where a countertop meets a wall or backsplash, closes the gap around a sink or cooktop cutout, and bridges seams between slab sections. It does not protect the stone’s porous surface from stains — that’s a separate product entirely.
Countertop Sealant vs. Granite Sealer: Two Different Jobs
Granite sealer is a penetrating or topical treatment absorbed into the stone’s pores across the entire countertop surface, reapplied every one to three years depending on stone porosity and sealer type. It blocks liquids from soaking into the stone and causing stains, but it does nothing at a seam or a cutout edge — it has no gap-filling capacity at all. Countertop sealant is the opposite: a flexible, gap-filling compound applied only at specific joints, never across the open field of the countertop.
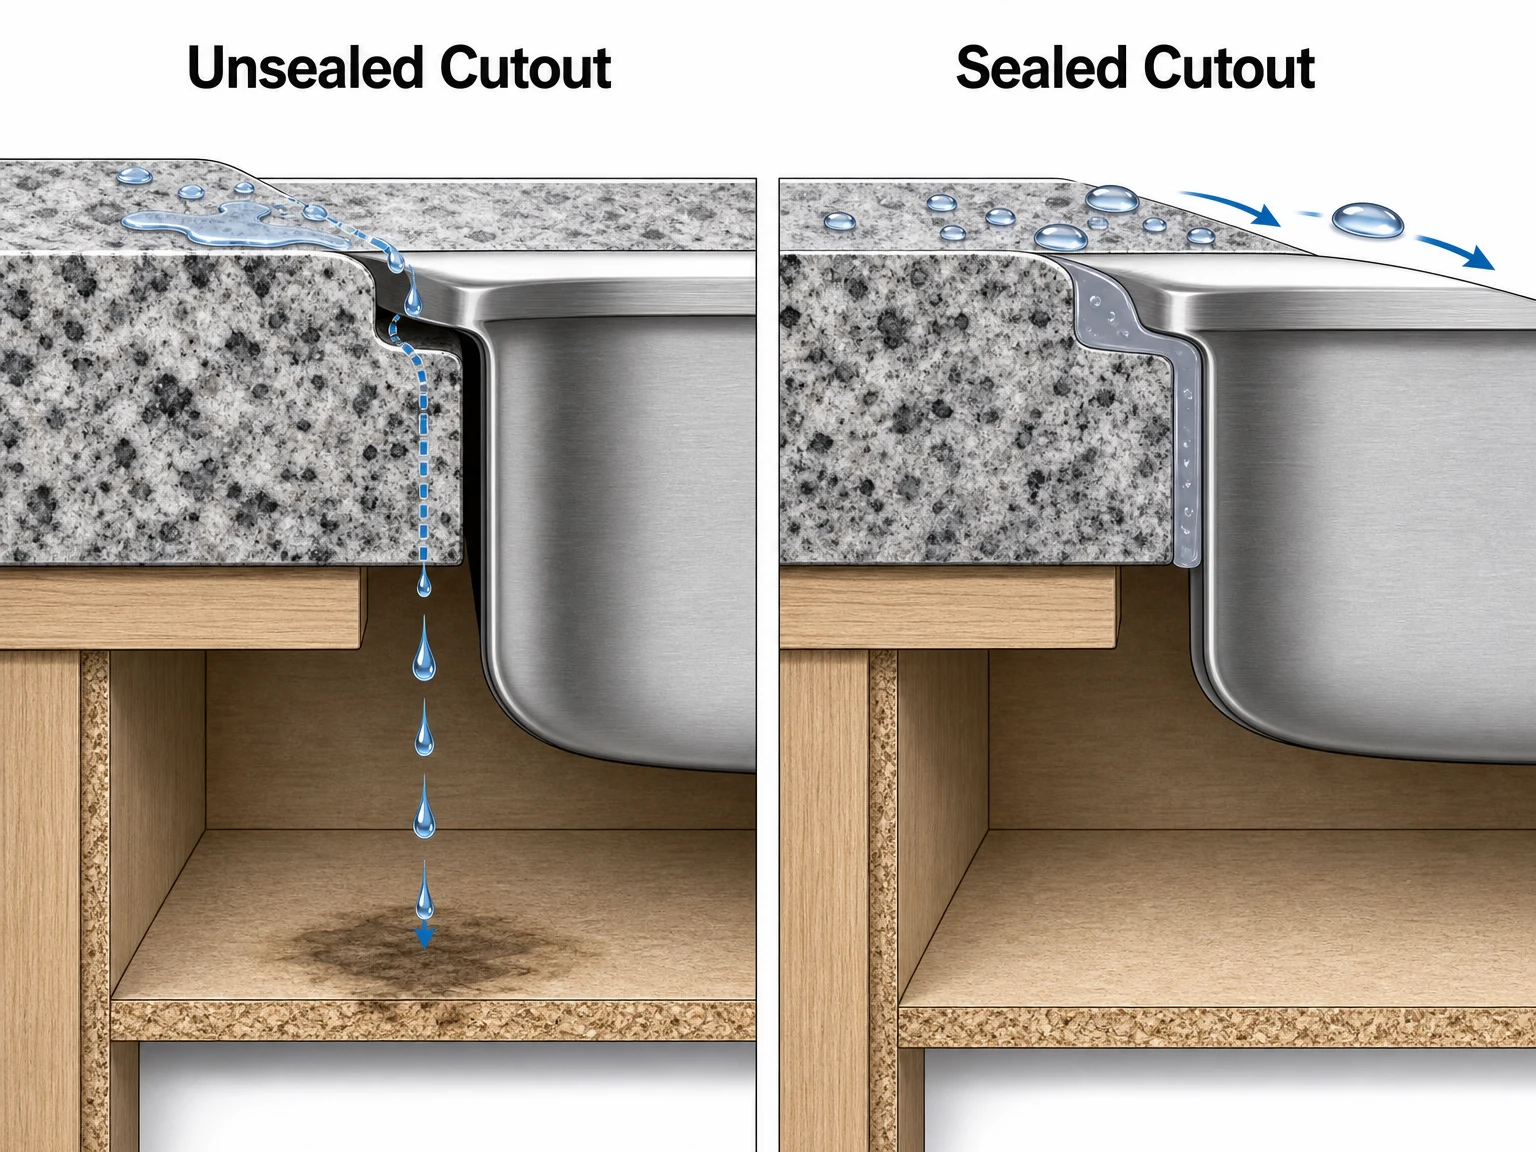
Treating them as interchangeable creates two common failures. Applying stone sealer into a sink cutout gap does nothing to stop water intrusion behind the sink rim — the gap stays open and water tracks into the cabinet below. Applying joint sealant across the entire countertop surface in place of a stone sealer leaves the field unprotected from staining and creates an uneven, glossy film that traps dust and looks nothing like a properly finished stone surface. Each product solves one problem; neither substitutes for the other.
Where Countertop Sealant Actually Belongs
Three joint types make up nearly all legitimate countertop sealant applications. The backsplash joint — where the countertop meets a wall or tile backsplash — needs a continuous bead to stop water from running behind the counter edge during normal kitchen use. The sink and cooktop cutout perimeter needs sealant between the fixture’s rim and the cut edge of the stone or laminate, preventing water from seeping into the particleboard or plywood substrate underneath undermount sinks especially. Slab seams, where two pieces of stone meet on an island or an L-shaped run, use a color-matched seam filler rather than a visible caulk bead, though the underlying chemistry is similar.
Each of these joints experiences different stress. The backsplash joint sees constant moisture exposure and occasional impact from kitchen activity. The sink cutout joint sees near-constant water contact and must resist mold growth in a humid, rarely-dried environment. Slab seams see almost no movement once the stone is properly supported, but any visible gap undermines the look of a continuous surface, so cosmetic match matters as much as waterproofing.
Matching Sealant Chemistry to Countertop Material
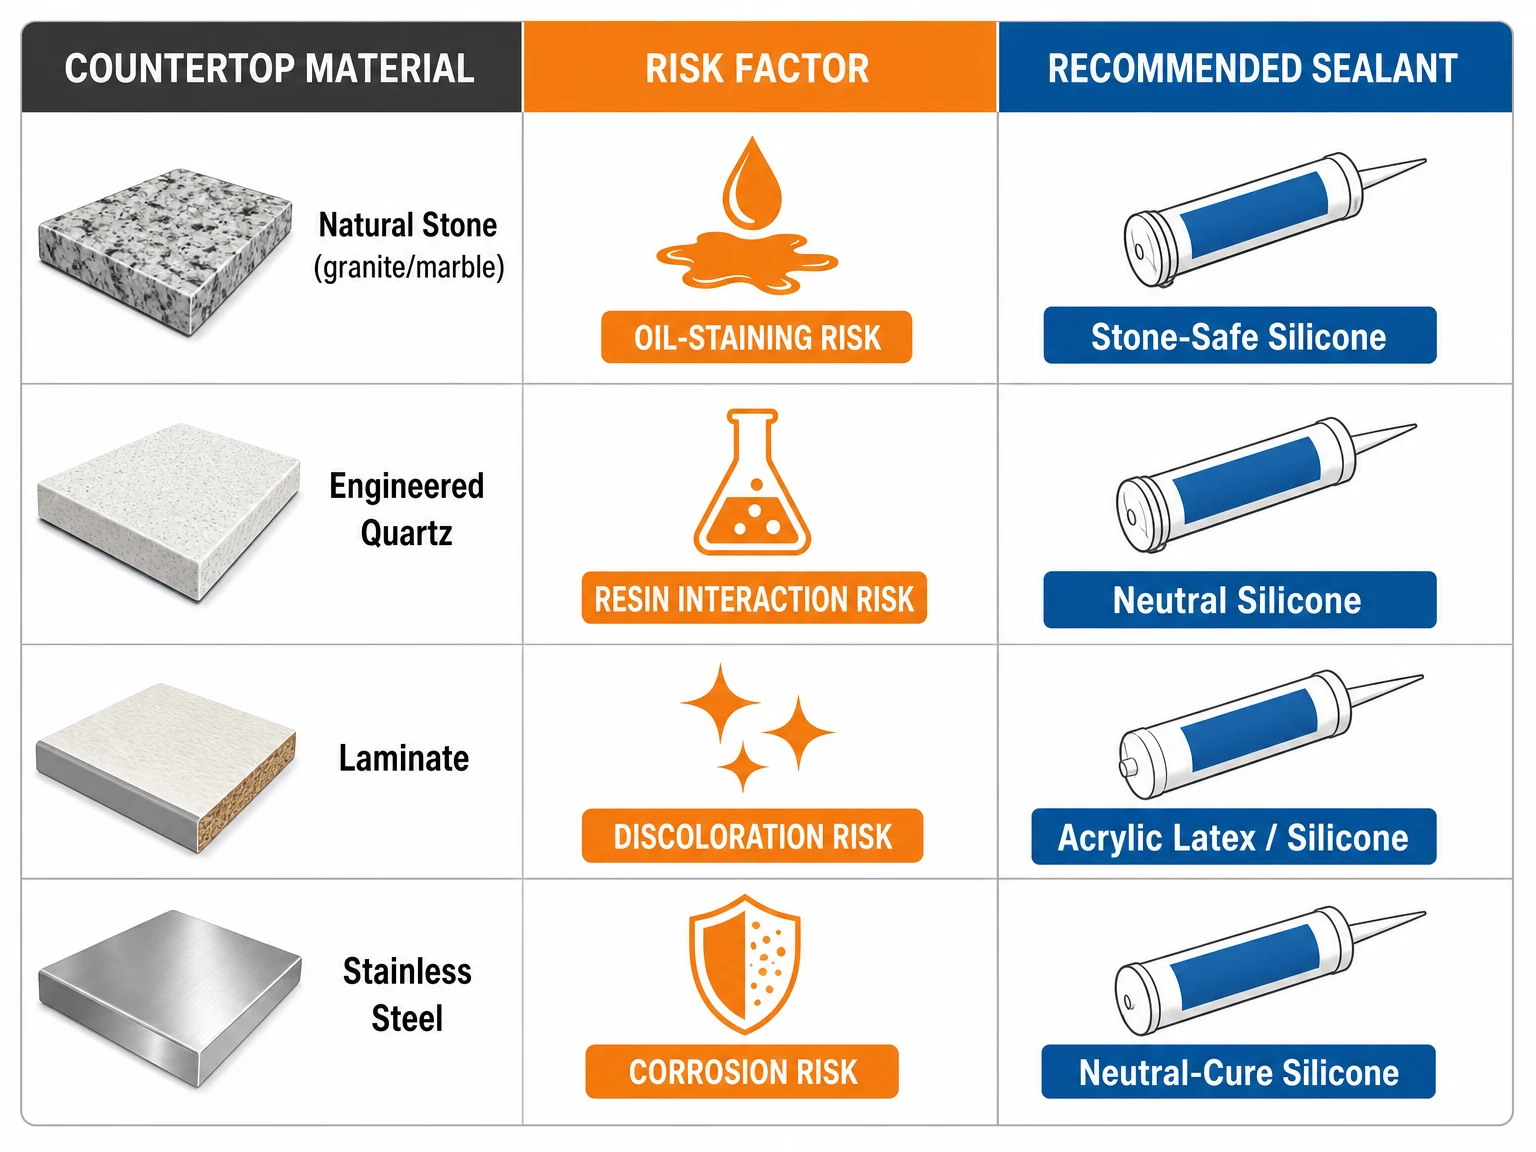
Countertop material changes which sealant chemistry actually works. Natural stone — granite, marble, soapstone — is porous and can absorb oils from certain silicone formulations, leaving a visible dark stain around the joint that never fully disappears. A 100% silicone sealant specifically labeled safe for natural stone, or a color-matched epoxy seam filler, avoids this. Engineered quartz is far less porous than natural stone but still benefits from a stone-safe silicone to avoid any resin interaction at the joint. Laminate countertops need a flexible acrylic latex or silicone caulk, since laminate’s thin decorative layer can discolor under some solvent-heavy sealants. Stainless steel counters need a sealant with genuine adhesion to metal, typically a neutral-cure silicone, since acid-cure silicones can corrode stainless over years of exposure.
Kitchen countertop sealant has one more non-negotiable requirement that bathroom or laundry sealant doesn’t: food contact safety. Any joint within reach of food preparation — around a cutting-board inset, along the backsplash near a prep zone — should use a sealant rated for incidental food contact once cured. This isn’t a marketing add-on; it determines whether cured residue near food prep is actually appropriate for a kitchen, and the rating should appear explicitly on the product’s technical data sheet, not be assumed from “kitchen and bath” branding alone.
Countertop Sealant Application: A Practical Walkthrough
Surface prep decides whether the joint lasts five years or fails within one. Remove any old caulk completely using a plastic scraper that won’t scratch stone, then clean the joint with isopropyl alcohol to strip oils and soap residue — stone and quartz both resist adhesion when any film remains on the surface. Mask both sides of the joint with painter’s tape for a clean line, since stone’s texture makes freehand tooling messy otherwise.
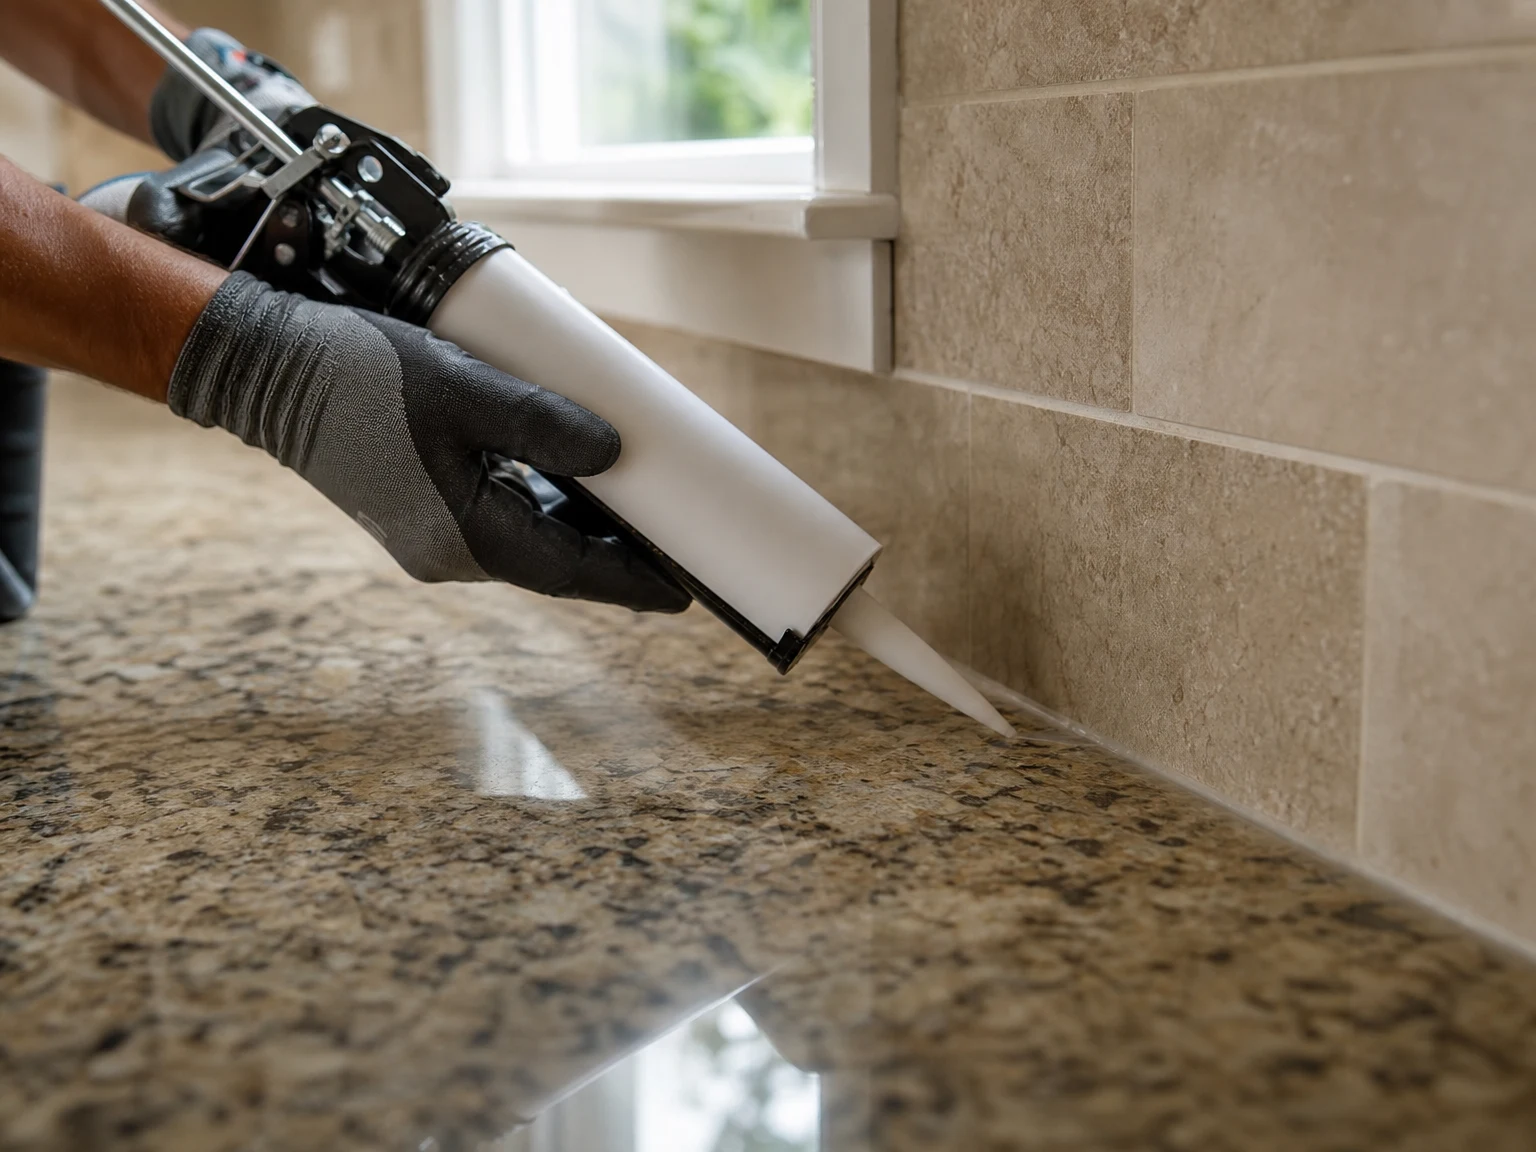
Cut the sealant tube tip at a narrow angle and apply a continuous, unbroken bead along the joint — stopping and restarting mid-seam is the most common cause of a weak spot that fails first. Tool the bead immediately with a wet finger or a dedicated caulk tool, working in one continuous pass rather than multiple back-and-forth strokes that can pull the bead away from one side of the joint. Remove the tape immediately after tooling, while the sealant is still wet, to get a sharp edge; waiting until the sealant skins over tears the bead instead of releasing cleanly.
Cure time matters more at a sink cutout than anywhere else in the kitchen. Most silicone and hybrid sealants reach a skin-formed, tool-safe state within 30 minutes but need 24 hours before any water contact and up to a week for full chemical cure. Running water in the sink the same day the joint was sealed is the single most common reason a fresh sink seal fails within weeks — the uncured sealant never fully bonds under constant moisture.
Countertop Sealant vs. Granite Sealer: Quick Reference
| Question | Countertop Sealant | Granite / Stone Sealer |
|---|---|---|
| What it does | Fills a specific joint or seam | Penetrates stone pores to block stains |
| Where it goes | Backsplash edge, sink cutout, slab seam | Entire countertop surface |
| Reapplication | Years, only if the joint fails | Every 1-3 years depending on porosity |
| Form | Flexible cured bead | Absorbed, mostly invisible |
| Can one replace the other? | No — leaves the surface unprotected | No — leaves joints open to water |
Common Mistakes
Skipping the alcohol wipe-down is the single most frequent cause of early adhesion failure — soap film and cooking oil residue on stone are often invisible but block proper bonding completely. Using a standard acid-cure silicone on natural stone instead of a neutral-cure, stone-safe formula risks the oil-staining discoloration mentioned earlier, sometimes not appearing for weeks after application. Caulking over an old bead without removing it first traps moisture between the two layers, giving mold an environment to grow where it can’t be seen or cleaned.
Applying sealant too thickly, layering multiple passes instead of one clean bead, is another frequent error — thick sealant skins over on the outside while the interior stays uncured for days, eventually cracking as the surface shrinks around the still-soft core. A single, properly sized bead tooled once cures evenly through its full depth.
Frequently Asked Questions
Is countertop sealant the same as granite sealer?
No. Countertop sealant fills specific joints — backsplash edges, sink cutouts, slab seams. Granite sealer penetrates the stone’s pores across the whole surface to block stains. They serve different functions and neither substitutes for the other.
Can I use regular silicone caulk around a stone countertop sink?
Standard acid-cure silicone can cause an oily-looking stain to develop on natural stone over time. Use a neutral-cure, 100% silicone or hybrid sealant specifically labeled safe for natural stone to avoid this discoloration.
How long does countertop sealant last before it needs to be redone?
A properly applied countertop sealant joint typically lasts five to ten years before it needs replacement, far longer than a surface stone sealer’s one-to-three-year reapplication cycle, since the joint isn’t exposed to the same abrasion and cleaning chemicals as the open countertop surface.
Does countertop sealant need to be food-safe?
Any joint within reach of food preparation areas should use a sealant explicitly rated for incidental food contact once fully cured. This should be confirmed on the manufacturer’s technical data sheet rather than assumed from general kitchen-and-bath marketing language.
Why did my sink seal fail within a few weeks?
The most common cause is running water in the sink before the sealant fully cured — most formulations need at least 24 hours before water contact and up to a week for complete chemical cure. Residue left on the surface before application and sealant applied too thickly are the next most frequent causes.
Need Help Choosing a Sealant?
Tell us your materials and application requirements.
SEND AN INQUIRY English
 العربية
 Español de México
 Русский
 Tiếng Việt
 Português do Brasil
 Bahasa Indonesia
 Türkçe