

Table of Contents
Sealant failure at an otherwise well-chosen joint traces back to a surprisingly small, often overlooked piece of foam more often than to the sealant itself. Backer rod is the flexible foam strip installed inside a joint before sealant goes in, and its job isn’t just to take up space — it controls sealant depth, blocks adhesion to the wrong surfaces, and shapes how the sealant actually performs under movement. Skip it or size it wrong, and even premium sealant can fail within one seasonal cycle.
What Backer Rod Actually Does
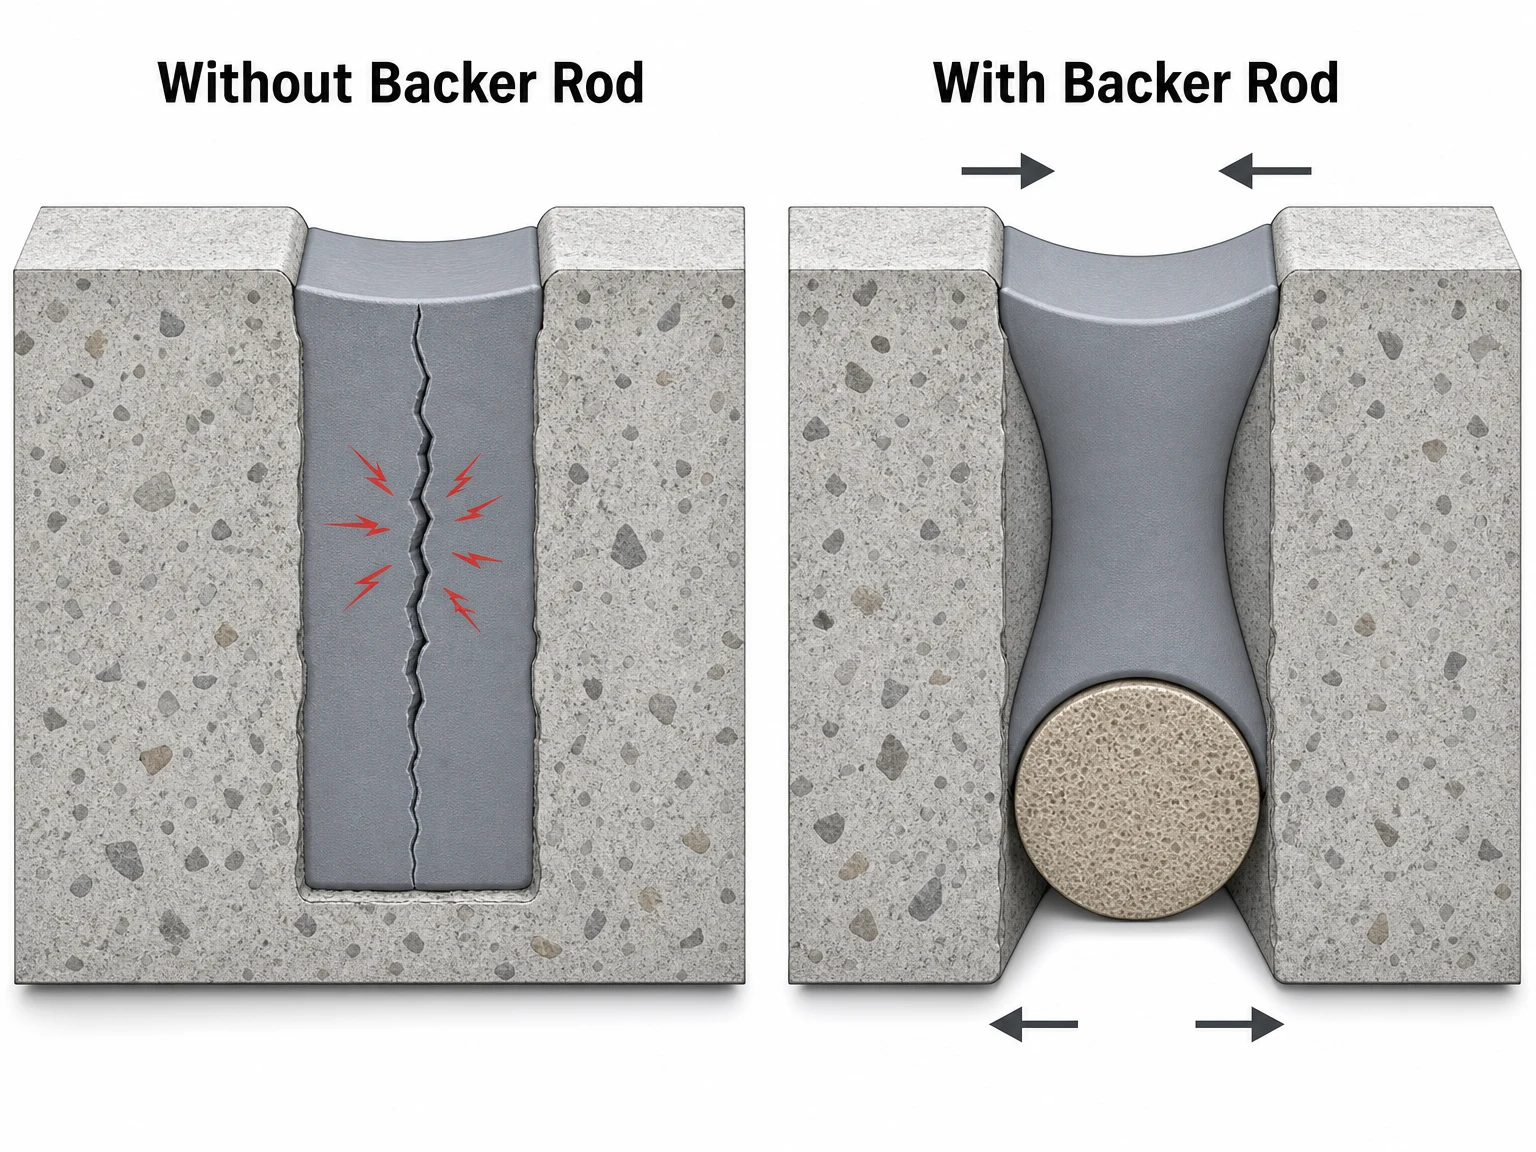
Three-sided adhesion is the core problem backer rod solves. In a typical joint — say, between two concrete slabs — the sealant naturally wants to bond to all three surfaces it contacts: the two vertical joint faces and the bottom of the joint. A sealant bonded on three sides can’t stretch and compress normally when the joint moves, because the bottom bond fights against the top surface trying to flex. This almost always causes the sealant to tear internally long before it would fail from weathering alone.
Backer rod placed at the bottom of the joint creates a bond breaker — a surface the sealant simply won’t stick to — so the sealant only bonds to the two vertical joint faces. This leaves the sealant free to form an hourglass-shaped cross-section as the joint moves, which is the shape that actually accommodates expansion and contraction without tearing. Backer rod also gives the applicator a firm backstop to tool against, making it far easier to control sealant depth and achieve a consistent, properly shaped bead across a long joint run.
Closed-Cell vs. Open-Cell Backer Rod
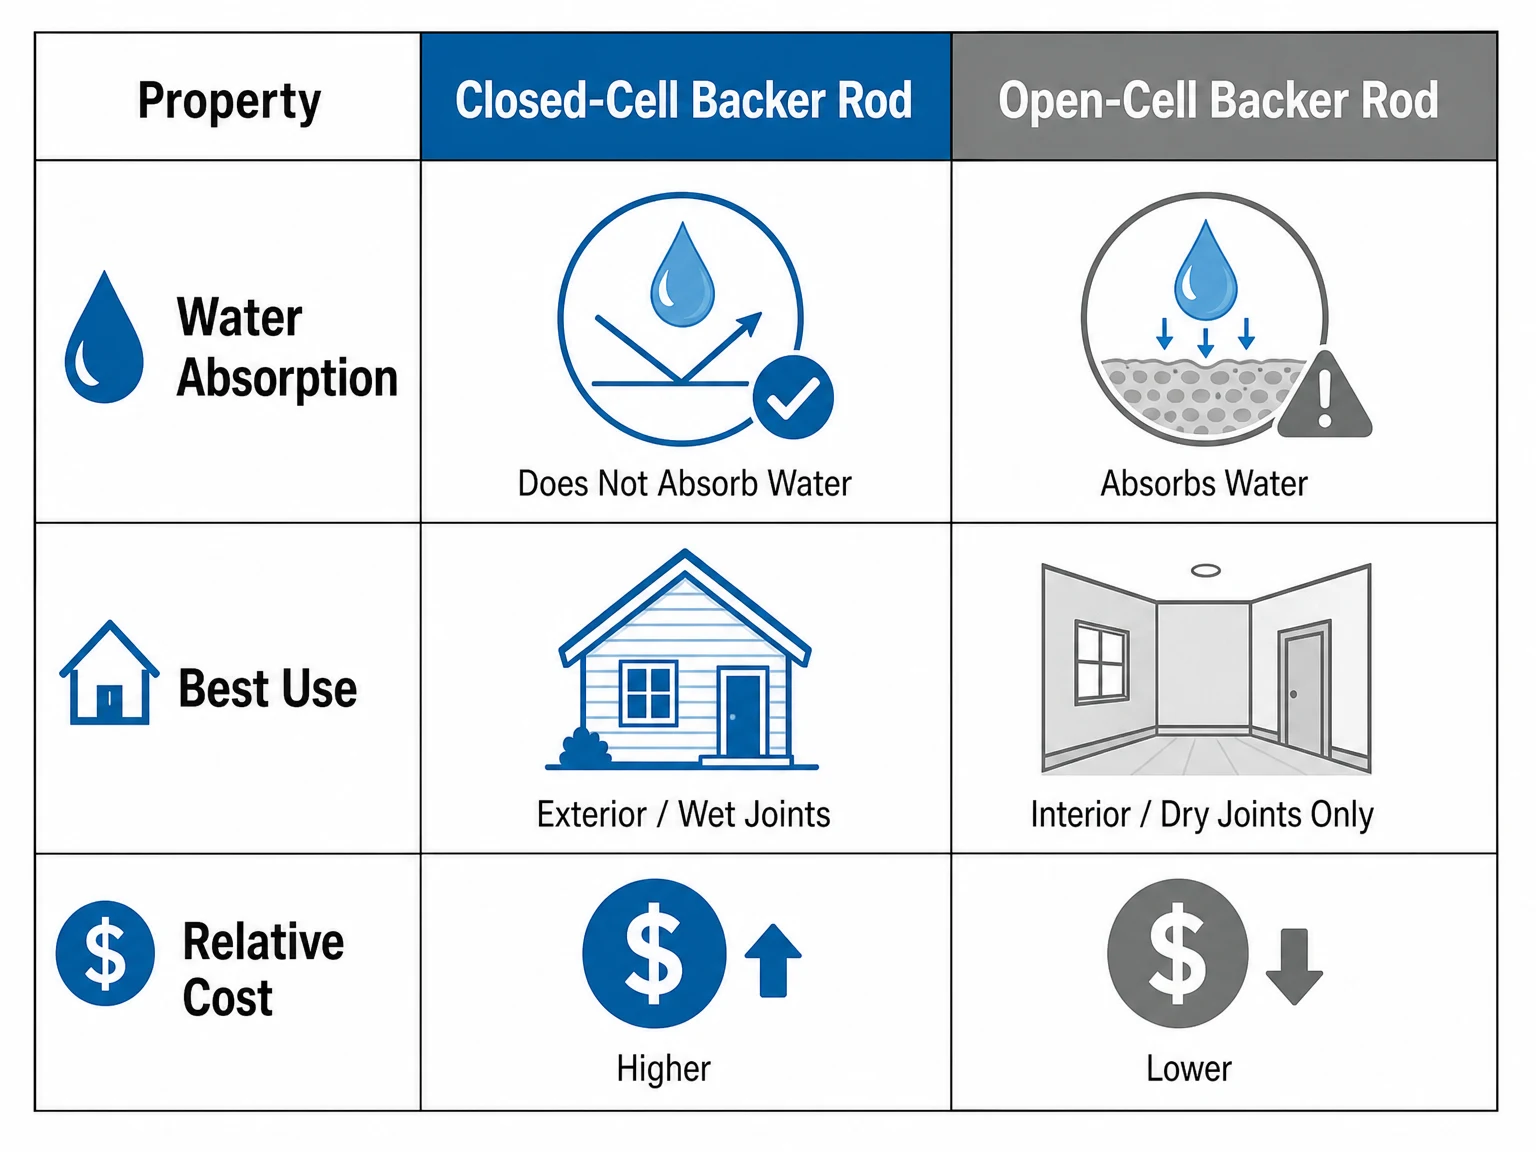
Closed-cell backer rod has a skin-like outer surface with sealed internal cells, which means it doesn’t absorb water. This makes it the correct choice for any exterior joint, any joint exposed to moisture, or any application where the backer rod might sit in a wet environment before or during sealant application — a water-logged open-cell rod can trap moisture against the sealant bead and interfere with proper cure, particularly with moisture-sensitive sealant chemistries.
Open-cell backer rod has an open, sponge-like structure that absorbs water readily, and it’s generally lower cost than closed-cell. It remains a reasonable choice for interior joints in consistently dry conditions, where moisture absorption is never a practical concern — basement control joints with no water exposure, interior expansion joints in climate-controlled buildings, or similar dry-use cases. Using open-cell rod in an exterior or wet-location joint, however, is a common and consequential mistake: the rod absorbs and holds water against the sealant, and in freeze-thaw climates that trapped moisture can expand and push the sealant bead outward from behind.
Sizing Backer Rod to the Joint
Backer rod needs to be oversized relative to the joint width to stay seated by compression rather than relying on adhesive or mechanical fasteners. The standard rule of thumb is roughly 25% larger in diameter than the joint width — a 1/2 inch joint typically takes a 5/8 inch backer rod, and a 3/4 inch joint typically takes a 1 inch rod. This oversizing compresses the rod slightly as it’s pushed into the joint, which holds it firmly in place at the correct depth without any additional adhesive.
Depth placement is just as important as diameter selection. The rod should be set so the remaining sealant depth matches the sealant manufacturer’s recommended width-to-depth ratio, commonly around 2:1 for a wide shallow joint or closer to 1:1 for a narrower joint, depending on the specific sealant’s movement capability rating. Setting the rod too deep leaves too much sealant depth, which slows cure and increases the chance of the sealant tearing under movement; setting it too shallow leaves too little sealant to actually bridge the joint’s expected movement range.
Backer Rod Diameter to Joint Width: Quick Reference
| Joint Width | Recommended Backer Rod Diameter | Typical Sealant Depth After Tooling |
|---|---|---|
| 1/4 inch | 3/8 inch | 1/8 – 3/16 inch |
| 1/2 inch | 5/8 inch | 1/4 – 3/8 inch |
| 3/4 inch | 1 inch | 3/8 – 1/2 inch |
| 1 inch | 1-1/4 inch | 1/2 – 5/8 inch |
Installation Notes
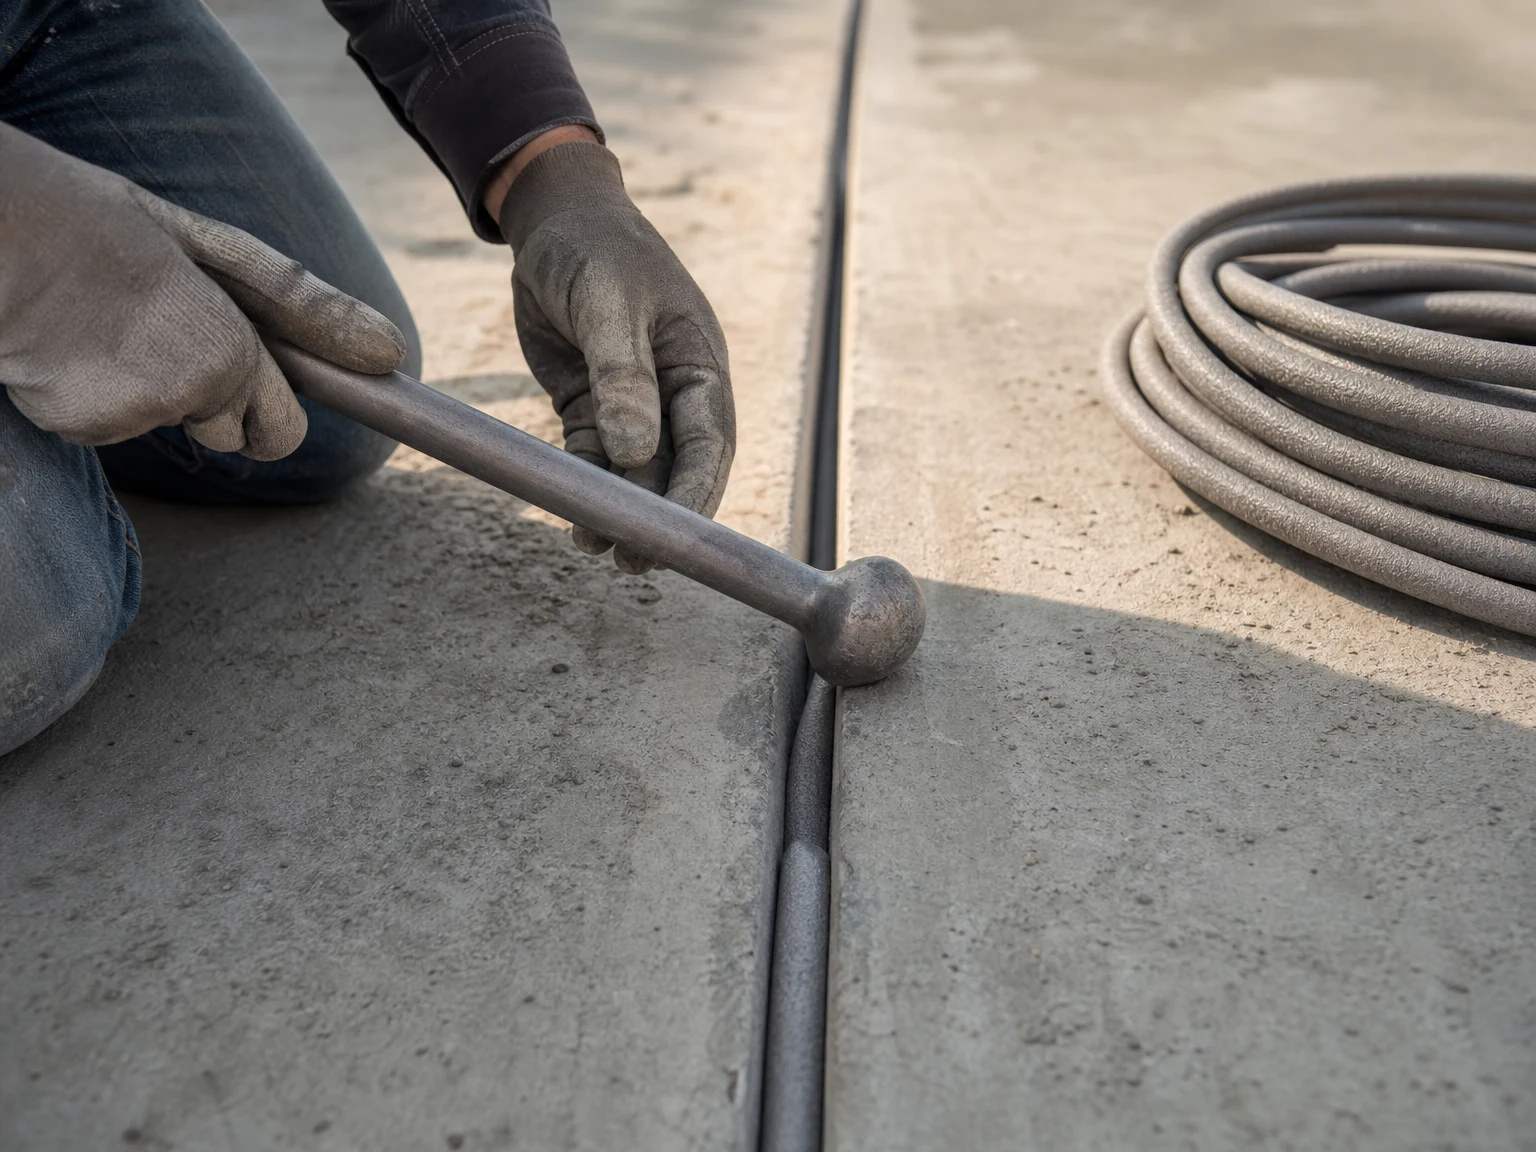
Install backer rod by compressing and rolling it into the joint rather than stretching it lengthwise, since stretching reduces its effective diameter and can leave it undersized at the point of installation. A blunt tool — many trades use a dedicated backer rod installation tool, though a rounded putty knife or similar object works for smaller jobs — helps push the rod to a consistent depth along the full joint length without puncturing it.
Avoid puncturing the rod during installation, especially with closed-cell rod — a punctured closed-cell rod can absorb water through the puncture point just like open-cell rod would, defeating the reason it was selected in the first place. Check the full joint run for consistent depth before applying sealant; an uneven backer rod depth produces an uneven sealant bead that’s harder to tool to a consistent, properly shaped profile.
Common Mistakes
Skipping backer rod entirely on a joint deep enough to need it is the most consequential mistake, since it leaves the sealant free to bond three-sided and tear internally under normal joint movement — a failure mode that often doesn’t show up until well after installation, making it hard to trace back to the missing rod. Using open-cell rod in an exterior or wet-location joint is the second most common error, trapping moisture against the sealant and risking freeze-thaw expansion damage in cold climates.
Undersizing the rod diameter relative to the joint width is a frequent and avoidable error — a rod that’s too small for the joint won’t stay compressed in place, shifts during sealant application, and can leave gaps that let sealant seep behind it, defeating the bond-breaker function entirely. Always size up by roughly 25% over the measured joint width rather than matching it exactly.
Frequently Asked Questions
Do I always need backer rod before applying sealant?
Backer rod is needed whenever the joint is deep enough that sealant would otherwise bond to the bottom surface as well as the two sides. Shallow joints where the sealant manufacturer’s recommended depth can be achieved without a backer may not require it, but most standard expansion and control joints do.
What size backer rod do I need for my joint?
As a general rule, choose backer rod roughly 25% larger in diameter than the joint width — for example, a 5/8 inch rod for a 1/2 inch joint. This oversizing lets the rod stay seated by compression at the correct depth without extra adhesive.
Is closed-cell or open-cell backer rod better?
Closed-cell backer rod doesn’t absorb water and is the correct choice for exterior or moisture-exposed joints. Open-cell backer rod is lower cost and acceptable for interior joints in consistently dry conditions, but it should not be used anywhere water exposure is possible.
Why did my sealant crack even though I used backer rod?
Cracking despite backer rod use is often caused by incorrect sizing or depth placement rather than the absence of the rod itself — an undersized rod can shift out of position, and incorrect depth placement can leave the wrong sealant width-to-depth ratio for the joint’s actual movement range. Confirm both the rod diameter and the resulting sealant depth against the sealant manufacturer’s specifications.
Can I use backer rod with any type of sealant?
Backer rod is compatible with polyurethane, silicone, and MS polymer sealants in general use. The main consideration is moisture: closed-cell rod should be used with moisture-sensitive sealant chemistries or in any application where the rod might be exposed to water before or during sealant installation.
Need Help Choosing a Sealant?
Tell us your materials and application requirements.
SEND AN INQUIRY English
 العربية
 Español de México
 Русский
 Tiếng Việt
 Português do Brasil
 Bahasa Indonesia
 Türkçe